PLEASE VISIT MY NEW BLOG

Sunday, November 27, 2011

Eight Projects of Chanukah: #2

Now that Thanksgiving weekend is almost over, it's time to stop talking turkey and get back into creating gifts for Chanukah.  With less than a month to go, there is no time to waste.

My second project in the Eight Projects of Chanukah series is this embellished candle holder.  This is a pretty alternative to the not-so-decorative box that the menorah candles come in from the store.

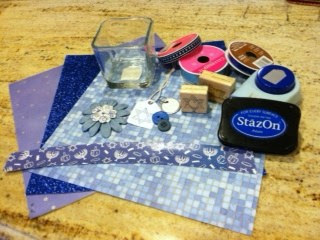
Supplies include:


- Libbey 4" x 4" square glass container (I bought these at the Dollar Store)
- Scrapbook Paper
- Ribbon
- Flowers
- Buttons
- Chanukah Charm
- Die-cuts
- Tag punch or ready-made tags
- Chanukah stamps
- Ink Pad

Instructions:

Make a template measuring 1-1/2" wide x 13-1/2" long, creating a slight arch.  The paper band must arch to accommodate the width difference between the top and bottom circumference of the glass.  Wrap the template around the glass to be sure it fits, overlapping the ends. 
Trace the template onto a 12" x 12" scrapbook paper, angling the template to fit the paper.  You can also cut two sections and piece them together, adding an extra 1/2" for overlap.

Mod Podge the paper band and let dry.  Using good adhesive, adhere band to the glass, gently pulling it taut, and overlap the ends. 

Embellish the glass using ribbon, flowers, charms, die cuts or stamped images on punched out tags to decorate the candle holder.

Place the candles inside the glass holder, and you have a beautiful way to display the menorah candles throughout the eight nights.


These glass containers can also be used to hold a votive candle.   Insert a small round candle holder and surround with blue and white jelly belly candies, sea glass or beads.  Place a votive into the smaller glass holder.  [Note to self:  After a few days, do not attempt to eat jelly belly candies.]

These make wonderful teacher and hostess gifts.  Wrap the entire candle holder with clear cellophane.  Tie with ribbon and a matching tag, and these are ready to go! 

Partying with:
the country chic cottage quick-and-easy-holiday-crafts
Rook No 17
Home for the Holidays
Today's Creative Blog
Project Queen
Creative Jewish Mom
Positively Splendid
Flamingo Toes Think Pink Sunday
I {heart} Naptime Sundae Scoop
The Gunny Sack
More Merrier Monday

Tuesday, November 15, 2011

Eight Projects of Chanukah

It's time to countdown to Chanukah. My intention was to post one project every week until Chanukah begins.  However, when I looked at the calendar, I realized there are only five weeks until the Festival of Lights!
I'm just going to have to work a little faster in order to create and post eight projects in just over one month.  So let's get altering! 
Hanukkah Gifts


The first of my eight projects is called "Chanukah-in-a-Jar."  There are many variations of recipes in a jar for delicious cookies, soups, natural scrubs, and more.  In fact, I've even altered empty tennis ball cans for brownies-in-a-tennis-ball-can recipes. 

For this project, I use a clear plastic pail that is 6" tall with a 4" diameter.  It has a lid as well as a handle, which lends itself nicely for attaching ribbons and tags. 

Gather craft supplies for embellishing the container including printed and solid scrapbook, glitter and gift wrapping paper, ribbon, punches, stamps, ink, tags, charms, metal labels, etc.
 

Chanukah decor


Cut a strip of cardstock 2" x 18".  If using a 12" x 12" piece of paper, you will have to cut two pieces and tape them together.  Then cut a coordinating piece of your gift wrap or printed paper 1-1/2" x 18"  Using a dry adhesive, tape these two long pieces together.  Adhere ribbon to center of strip.

Using a 2-1/2" circle punch, cut a circle with glitter paper.  Punch out two smaller circles (I used a scalloped punch, too) from the solid cardstock.  Stamp image on smaller circle.

Adhere long strips to pail. Also adhere ribbon in the middle of the paper, finishing at the same seam as the paper.  Then adhere the circles to the pail, covering up the seams. 
Chanukah stamps

Using varied textures and widths, cut 6" strands of coordinating ribbon to pail handle.  Cover the inset of the lid with paper with mod podge.  When dry, adhere label printed on cardstock and metal label holder to lid.  Tie charm to metal holder.
Happy Hanukkah
Stamp "Happy Hanukkah" and "To/From" images to tags.


Decoupage top of the dreidel, using 1-1/4" square punch.  Punch a small hole in center of the paper square, which will fit over the dreidel stem.
playing dreidel

Then choose the "ingredients" for your jar.  I suggest an entire box of 44 menorah candles (enough candles for each night), large dreidel, matchbox, chocolate gelt and candle blessings. 

For the blessings, I printed the Hebrew, transliteration and translation on both sides of a 4" x 6" cardstock, rolled it up and tied it with blue & white twine.
Chanukah gelt
 The match box is embellished with cardstock and a stamped image that reads "Happy Hanukkah".

Decorating matches for Hanukkah

Carefully place the candles and other "ingredients" inside the pail. 
That's it!  Here is the completed Chanukah-in-a-Jar:
Handmade Hanukkah GiftPin It

If you would like a copy of the blessings document, leave a comment with your email, and I will be glad to send it to you.

Stay tuned for the second Chanukah project coming soon!

Linking to these terrific blogs:
Weekend Bloggy Reading


Related Posts Plugin for WordPress, Blogger...