PLEASE VISIT MY NEW BLOG

Monday, July 25, 2011

Guest Posting at Someday Crafts!

Here it is mid late July, and the summer passes me by like rushing whitewater against the sandy shore.  I have so many creative ideas that need to be channelled from my right brain to my coffee-themed craft room.  I'm not even going to begin with my excuses...that would be an entire post in and of itself! 

Well, today is a new day!  And to spice things up a bit, I am guest blogging on one of my favorite blogs, Someday Crafts.  Michelle just had a beautiful baby boy and needs all the sleep she can get.  So while she's catching up on some much needed zzz's (right, who are we kidding?), Michelle  is graciously sharing her popular site with guest bloggers--and today is my turn! 

Here is a sneak peek of my guest post:


 You'll have to click over to Someday Crafts
to see the entire project and tutorial.


When you do, come on back and leave me a comment that you did!  It's Monday, and I can use all the affirmation I can get today (LOL). 

Have a great week!
Doreen

Wednesday, June 15, 2011

fun in the sun

College Graduation - check!  So both girls have now graduated, one from high school, and one from college.  It's been a busy week full of smiles and photo ops.  What now you ask?  SUMMERTIME!

What better way to kick off summer than with May Arts' Back to the Beach contest.  [This is a re-post from June 2011.]

May Arts provided the ribbon, and I chose an aqua, yellow and tan color combination as the basis of my project.  Here is the finished plaque:

Summertime art projects

And here are photos of the creative process with a brief tutorial.

Paint outside edge of the plaque with "Bahama Blue" acrylic paint [by  Americana].
Let dry.  Cover area with painter's tape. 

Paint inner edge with "Bleached Sand", creating a picture mat effect.

While paint is still wet, CAREFULLY remove painter's tape. 
[Ignore the messy center because that will be covered with paper.]
Mod Podge paper to inside portion of the plaque.  [photo not available] 

My favorite part:  Embellishments!
flowers using ribbon
 Ruched flower using two different May Arts ribbon


Looped ribbon, adhered to back of acrylic photo frame; 
Chipboard letters, ribbon

 More ribbon tied to hanging wire

 Ribbon and sand dollar attached to letter "n"

photo frame transformations
 Close-up of ribbon combo

 A lot more ribbon, flip flops,
suntan lotion and seahorse charms pocketed in loops

 Flowers made with ribbon and buttons

transforming photo frames
Insert photo and Voila!

Now grab your towel and meet us at the beach
so you can create your own beach memories.

Sharing here:
csi1
Someday Crafts


Thursday, June 2, 2011

Next Step: Real Life

I'm sure you have been on the edge of your chairs just waiting to see how
this little $1 spiral notebook was transformed.  Well, wait no more. 
This 4-1/4" x 3-1/4" has been altered, despite its pocket-sized appearance.  Take a look:


Materials used include:
graduation-theme scrapbook paper
blue cardstock, stamped with graduation cap image
one small gold brad, yellow embroidery floss
square cutout chipboard
"Good Luck" & "Dream BIG" stickers
rosebud button, chipboard key
assorted ribbon, pink pearl bling
label maker, blue acrylic paint, Mod Podge
 

Put together with the photo frame and candy jar,
your graduate will cry tears of joy over all the work that went into this thoughtful gift ensemble. 
Yeah, right.  Who are we kidding?
Well, at least they were fun to make.   Pass me the candy jar.

Tuesday, May 24, 2011

Hats off to You!

Graduation Gift
AP tests - check.
Prom - check.
Senior Awards Night - check.
GRADUATION!

As promised, here is my second project for graduation gifts. 
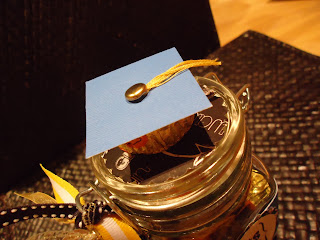
What better way to say "I'm so proud of you" than with a jar full of chocolate?

Supplies needed:
1 bag* Chocolate Peanut Butter Cups
[*note:  If you can resist eating any of the candy yourself,
then you only need 1/3 of a bag.]
 4-1/2" tall Glass Hinged Jar ($1 at Mike's)
Scrapbook Paper in school colors
In addition to blue cardstock,
I used graduation-themed paper from TC Studio's "Hats Off" Pad.
Coordinating Ribbon
Graduation Stamp Set
Gold Brad
Embroidery Floss
Square, Circle & Scalloped Punches
Small Charms


(I made two versions.  This one uses two coordinating papers.)
Wrap jar with  1-3/4" x 10" strip of paper.
Add narrow strip of contrasting paper, if desired.

Punch scallop circle and plain circle, stamp with "Hats off to You" image.
Place ribbon behind stamped image.  Adhere to jar.
Graduation Candy Jar
Punch out another scallop circle and adhere to top of jar. 
Punch out square cardstock, attach floss with brad.
Adhere to peanut butter cup, and adhere to jar top.
Add coordinating ribbon and charms to hinge.
I used a star charm and a tiny metal "congrats" tag. 

Here is the finished project:
cute grad favorsPin It
These jars are so versatile, and can be embellished for any occasion. 
Click here to see the ensemble I made in February.

While I whipped up this candy jar, I decided to quickly transform the graduation photo frame I posted a few days ago, giving it a feminine touch. 

Either way, I hope your graduate will like it! 
Make your own graduation photo frame

Here is a preview of my third altered artworks graduation project.
Check back soon to see how I alter this mini spiral notebook.

Friday, May 20, 2011

Pomp & Circumstance

Pomp & circumstance...and a cupful of [happy] tears!  Yes, it's graduation season.  Whether your child is graduating from kindergarten or college, it's an emotional time for us Moms.  Where did the years go?  Wasn't she just starting to crawl?  walk?  talk?  ride a bike?  sneak out of the house wearing make-up?  borrow the car keys?  go off to college?   Quick -- hand me the Valium!
Thanks.  I feel much better now.  Actually, the best Rx for times like this is
CREATIVE THERAPY! 
Here is the first in a series of graduation projects I would like to share, beginning with a photo frame.  
Here is the before-and-after picture.
I used a 10-1/2" x 4-1/2" MDF frame from Michael's. 
It holds a 4" x 6 photo. 


Assemble as many graduation-themed items from your stash,
or treat yourself to a quick trip to your local craft store. 
Choose paint to match your school colors. 
 
Remove the glass insert and set aside.  Paint the entire frame and let dry. 
Stamp graduation sentiment onto glossy paper.  Adhere to frame.
 [Hint:  I use Mod Podge to adhere most of the items to the frame.]
[Disregard streaky look in photo above.]


I am a sucker for my Label Buddy, so I typed out "Class of 2011." 
Stickers and rub-ons will work too.
Adhere to bottom of frame.
Add dimensional quote.  I chose the definition of  "wisdom."
Add decorative embellishments.
[I used stickers, silver sparkles and grad cap and diploma buttons.]

Lastly, I inserted a 4" x 6" graduation-themed scrapbook paper
[which will be replaced with a real graduation photo]. 
Replace glass insert.
Voila! 
Now pass the tissue box and save me a seat at the ceremony.

Linky parties:
Diana-Rambles


Related Posts Plugin for WordPress, Blogger...