PLEASE VISIT MY NEW BLOG

Tuesday, August 30, 2011

Birthdays, Chocolate and the End of Summer


The end of the summer always "begins" with my birthday celebration. Although my hubby suggested I invite friends over for a fun crafting soiree, I chose to spend the day with him and the kids.  Our older daughter, a recent UC Davis college grad [Go Aggies!], just landed a real career-job, and is now living in the OC, closer to home.  While in two days, our younger daughter leaves for the other side of the country to begin college (hello, Boston!).  So I chose to get out of the 107' weather, rack the bikes up to the back of the car, and enjoy cooler breezes and exercise on the beach.

However, there will be plenty of
CT [Creative Therapy]
in the coming weeks.

And I will need it! 

So look for new altered art posts soon.    In the meantime, I want to thank Carol, Head Chocolatier, at the fantastic blog, The Answer is Chocolate.  While she enjoyed her own family vacation and getting her son off to college, Carol featured many incredibly crafty bloggers.  I am thrilled to be one of them. 

So click here to see me over there.  While visiting, browse through Carol's blog to view her creative talents including great craft projects as well as tasty chocoholic recipes.  

Chocolate and Crafts -- You gotta love the combo!


Thursday, August 18, 2011

Gothic Art, Momma Style

Gothic art, a Medieval art movement that developed in France out of Romanesque art in the mid-12th century, has taken on a revival of sorts, especially in clothing and accessories.  Sometimes misunderstood, goth is usually considered counterculture.  

Well, this is as counterculture as I get -- my version of Gothic artwork, Momma style! 


Using a new Gothic-style paper collection, I chose paper with a black background and bright pink and lime green chandeliers.  Although I wanted to go with lime green accents, I started this project while on vacation with a very limited art supply. [Boogie board trumps craft boxes.]  So I used what I had, and I chose pink, which at least matched the paper. 

This canvas measures 10" wide x 8" tall. I painted the edges pink, and when dry, decoupaged the paper to the canvas, leaving 1/8" border along the sides. Once this dried, I used very little paint and light brush strokes to make the paper look "edgy."   I tried my best to paint outside of the lines, literally and figuratively.

 
I then cut coordinating card stock measuring 4-1/2" x 6-1/2" and 4" x 6" and decoupaged it to the canvas at an angle. The photo frame will be placed on top of this.

Once home [the vacation flew by way too quickly], I gathered together a variety of coordinating embellishments, and chose those that would enhance the project.

I love ribbon!
 
Using strong double-sided adhesive, I adhered a 4" x 6" acrylic frame in place.


The I added one of my favorite vacation photos.  The great thing about using an acrylic frame is that you can change the photo whenever you want!  I stapled black & white ribbon to the side of the photo frame, a trio of flowers to the top left corner of the frame, and a single flower at the opposite end.  I used buttons and large brads for the flower centers.


I then added a mini frame, an acrylic key and lock, and two pink photo turns, framing "best buds" which was printed on a transparency. [Hint:  When using transparency, print on rough side of paper so the ink does not smear.]

See the "edgy" pink & black-dotted bead trim? I adhered it to the back bottom of the frame. I love how it dangles from the canvas. I also love the fact that I finally used this trim as I have had it in my stash for over ten years!


Pin It
 
This Gothic-inspired wall canvas is now ready to hang. 
Of course, it doesn't match any room in our house...at least not yet.

Monday, August 15, 2011

Keep Calm [and Ride On]

[This post originally appeared as a guest blog on Positively Splendid.]

Being a student in a small college town has its perks -- like riding your bike from your apartment to class, meeting friends downtown for coffee, and stopping at the library for a study session, and then cycling back home, all while exercising your brain and your body. 

In June, our older daughter graduated from this bicycle-friendly academic world that she enthusiastically embraced for four years.   Is she ready to go out and make her mark on the world?  Well, ready or not, here she comes!  And in this day of high unemployment and economic despair, I am happy to report she just landed a professional job in her field of study. 

As a mother, it is nerve-wracking exciting to cheer from the sidelines, as one's children take their first steps towards becoming self-sufficient in the "real" world. I know she'll be fine. I'm not so sure about me. Thank goodness I have my creative therapy. Thus, I present my altered art canvas entitled, "Keep Calm and Ride On."
                                          

This two-piece canvas uses the college graduation announcement and one of my favorite photos from that special day.  The photo captures her walking away, while taking a quick glance back.   I love how this represents her moving forward with her life, while always treasuring her wonderful college days. 

The supplies:

12" x 12" and 12" x 4" artist canvasses
four eye screws
acrylic paint
cardstock - two solid colors and coordinating paper [I used the college colors]
chipboard letters
large and small Prima flowers
Buttons and hemp cord or embroidery floss
2011 tassel (found at Dollar Store)
decorative pearl brad
3 different coordinating ribbons, 16" in length
acrylic parentheses
bicycle stamp and black Staz-on ink
college announcement
photo

The process: 

Paint both canvas pieces.  Let dry.

Cut solid color cardstock 1/2" smaller than larger canvas.  Cut coordinating papers to fit accordingly.

Decoupage cardstock and coordinating paper to canvasses.

Stamp [bicycle] image onto printed paper.  Trim and mat with solid paper, adhere to canvas.

Mat photo.  Position in place, but do not yet adhere.

Apply chipboard letters [I looped the tassel to one of the letters] and acrylic parentheses.


Using hot glue, adhere buttons to wheels on bicycle image.


Decoupage announcement and text onto canvas.  Hot glue layered flowers and small button, slightly overlapping onto announcement and text.


When dry, decoupage entire canvas which adds luster and holds chipboard letters in place.

Using 3D foam squares, adhere matted photo to canvas and hot glue pearl brad.

Measure and mark 3" in from sides on canvas edges [bottom edge for large canvas and top edge for smaller canvas].

Twist eye screws into canvas at marks, so canvasses line up.

Cut ribbon into 8" lengths. Tie three ribbons together, inserting ribbon through matching eye screws.
This connects the canvas pieces.  Trim ribbon ends at a diagonal.


The altered artwork canvas is now ready to display and can easily be mounted on the wall using one nail.


Now one question remains: Who gets to keep it? The proud Mom [me] or the new college graduate [her]?

Linking to some of these crafty blogs and:
That DIY Party
Creative Jewish Mom
Three Mango Seeds
Serenity Now Weekend Bloggy Reading
its so very cheri /its-party-time
homemaker on a dime creative-bloggers-party-hop
a bowl full of lemons
Making the world cuter Monday
Just Something I Whipped Up
Today's Creative Blog
share-wealth-wednesday
savvysouthernstyle wow-us-wednesdays
Flaunt it Friday


Wednesday, August 3, 2011

Keep Calm and Ride On

OMG!  It must be my incredibly lucky day because today I'm featured on Positively Splendid.  Amy's wonderful blog is packed full of everything creative -- crafts, sewing, baking, painting, tutorials, decor and...well, everything!  I'm totally exhausted just thinking about all the inspiration that Amy shares. 

So, grab a cup of coffee or tea (I'll have a large iced latte please) and join me over at one of my favorite blogs, Positively Splendid, to see my newest altered artwork, "Keep Calm and Ride On."  It's a two piece mixed media canvas, celebrating.  Celebrating what?  Hop on over and see for yourself.  Then I hope you will come back here and leave me a comment with what inspires your creativity. 

See you over there!

Monday, July 25, 2011

Guest Posting at Someday Crafts!

Here it is mid late July, and the summer passes me by like rushing whitewater against the sandy shore.  I have so many creative ideas that need to be channelled from my right brain to my coffee-themed craft room.  I'm not even going to begin with my excuses...that would be an entire post in and of itself! 

Well, today is a new day!  And to spice things up a bit, I am guest blogging on one of my favorite blogs, Someday Crafts.  Michelle just had a beautiful baby boy and needs all the sleep she can get.  So while she's catching up on some much needed zzz's (right, who are we kidding?), Michelle  is graciously sharing her popular site with guest bloggers--and today is my turn! 

Here is a sneak peek of my guest post:


 You'll have to click over to Someday Crafts
to see the entire project and tutorial.


When you do, come on back and leave me a comment that you did!  It's Monday, and I can use all the affirmation I can get today (LOL). 

Have a great week!
Doreen

Wednesday, June 15, 2011

fun in the sun

College Graduation - check!  So both girls have now graduated, one from high school, and one from college.  It's been a busy week full of smiles and photo ops.  What now you ask?  SUMMERTIME!

What better way to kick off summer than with May Arts' Back to the Beach contest.  [This is a re-post from June 2011.]

May Arts provided the ribbon, and I chose an aqua, yellow and tan color combination as the basis of my project.  Here is the finished plaque:

Summertime art projects

And here are photos of the creative process with a brief tutorial.

Paint outside edge of the plaque with "Bahama Blue" acrylic paint [by  Americana].
Let dry.  Cover area with painter's tape. 

Paint inner edge with "Bleached Sand", creating a picture mat effect.

While paint is still wet, CAREFULLY remove painter's tape. 
[Ignore the messy center because that will be covered with paper.]
Mod Podge paper to inside portion of the plaque.  [photo not available] 

My favorite part:  Embellishments!
flowers using ribbon
 Ruched flower using two different May Arts ribbon


Looped ribbon, adhered to back of acrylic photo frame; 
Chipboard letters, ribbon

 More ribbon tied to hanging wire

 Ribbon and sand dollar attached to letter "n"

photo frame transformations
 Close-up of ribbon combo

 A lot more ribbon, flip flops,
suntan lotion and seahorse charms pocketed in loops

 Flowers made with ribbon and buttons

transforming photo frames
Insert photo and Voila!

Now grab your towel and meet us at the beach
so you can create your own beach memories.

Sharing here:
csi1
Someday Crafts


Thursday, June 2, 2011

Next Step: Real Life

I'm sure you have been on the edge of your chairs just waiting to see how
this little $1 spiral notebook was transformed.  Well, wait no more. 
This 4-1/4" x 3-1/4" has been altered, despite its pocket-sized appearance.  Take a look:


Materials used include:
graduation-theme scrapbook paper
blue cardstock, stamped with graduation cap image
one small gold brad, yellow embroidery floss
square cutout chipboard
"Good Luck" & "Dream BIG" stickers
rosebud button, chipboard key
assorted ribbon, pink pearl bling
label maker, blue acrylic paint, Mod Podge
 

Put together with the photo frame and candy jar,
your graduate will cry tears of joy over all the work that went into this thoughtful gift ensemble. 
Yeah, right.  Who are we kidding?
Well, at least they were fun to make.   Pass me the candy jar.

Tuesday, May 24, 2011

Hats off to You!

Graduation Gift
AP tests - check.
Prom - check.
Senior Awards Night - check.
GRADUATION!

As promised, here is my second project for graduation gifts. 
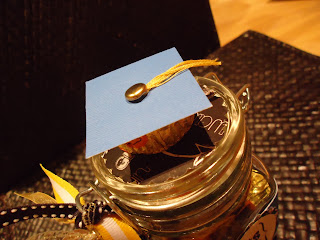
What better way to say "I'm so proud of you" than with a jar full of chocolate?

Supplies needed:
1 bag* Chocolate Peanut Butter Cups
[*note:  If you can resist eating any of the candy yourself,
then you only need 1/3 of a bag.]
 4-1/2" tall Glass Hinged Jar ($1 at Mike's)
Scrapbook Paper in school colors
In addition to blue cardstock,
I used graduation-themed paper from TC Studio's "Hats Off" Pad.
Coordinating Ribbon
Graduation Stamp Set
Gold Brad
Embroidery Floss
Square, Circle & Scalloped Punches
Small Charms


(I made two versions.  This one uses two coordinating papers.)
Wrap jar with  1-3/4" x 10" strip of paper.
Add narrow strip of contrasting paper, if desired.

Punch scallop circle and plain circle, stamp with "Hats off to You" image.
Place ribbon behind stamped image.  Adhere to jar.
Graduation Candy Jar
Punch out another scallop circle and adhere to top of jar. 
Punch out square cardstock, attach floss with brad.
Adhere to peanut butter cup, and adhere to jar top.
Add coordinating ribbon and charms to hinge.
I used a star charm and a tiny metal "congrats" tag. 

Here is the finished project:
cute grad favorsPin It
These jars are so versatile, and can be embellished for any occasion. 
Click here to see the ensemble I made in February.

While I whipped up this candy jar, I decided to quickly transform the graduation photo frame I posted a few days ago, giving it a feminine touch. 

Either way, I hope your graduate will like it! 
Make your own graduation photo frame

Here is a preview of my third altered artworks graduation project.
Check back soon to see how I alter this mini spiral notebook.
Related Posts Plugin for WordPress, Blogger...