PLEASE VISIT MY NEW BLOG

Showing posts with label DIY. Show all posts

Saturday, October 31, 2015

Jewelry Holder for the Tennis Fan


You gotta love a sport where each game starts with the word LOVE.  
Even though it means you haven't scored any points yet, it is a kinder way to say ZERO.
When DecoArt asked me to create room decor for a sports fan, tennis immediately came to mind.  As it turns out,  I am a decent player on the doubles court.  

I started this project on a search for a vintage wooden tennis racquet  You can usually find them hiding in the corners of thrift stores.  I paid $6, which was a bargain compared to the ones I saw at last week's flea market for $50 and more!

I sketched out my plan to turn the racquet into not only decor, but a useful jewelry holder.  
I chose colors that tied into tennis: blue representing the courts and neon yellow for the ball, with white & black for the trim.  The paints are Americana Multi-Surface Satin Acrylic.
 First, I painted the entire racquet (including the strings).
 Then I painted white stripes on the handle and sides of the racquet face
 and added rhinestones around the frame.
The ball was a bit tricky.  I didn't want to try cutting a real tennis ball in half. After some thought, I used a paper mache cupcake top, which has a flat bottom.  I painted it neon yellow with white stripes, added a sticker that reads, "Queen of the Court," and hot glued it to the racquet face.
Queen of the court
 Lastly, I screwed small cup hooks into the holes where the strings are looped through.
Voila!  Not only will I kill it on the court, I will now be able to quickly accessorize my outfit before warming up.  
tennis jewelry

Queen of the Court

You might also like these handmade gift ideas for sports fans:
gifts for tennis

Baseball Crafts


altered cans


Sharing this project at these parties:

Disclosure: DecoArt provided me with product and compensation for this project. 
However, all ideas and opinions are 100% my own.


Thursday, September 10, 2015

Game Night with Old Friends


I'm participating in the DecoArt Mystery Box Challenge.  
Please visit the site and vote for your favorite!
Hint:  My project is #9

My MahJongg group had just left when I received a mystery box in the mail from DecoArt.  I quickly opened it, revealing its contents: a paper mache box in the shape of a house, luscious fluid acrylics in four vibrant hues, DecouPage and Liquid Glass.   It was the perfect starting point for my project, “Game Night with Old Friends.” 

Game Night was, and still is, popular among friends and families.  Vintage games are resurfacing including MahJongg, Scrabble and Rummy-Q.  So I used iconic game pieces to turn my paper mache house into a FUN-KY candy holder, perfect for our next Girls Night Out.  

Products Used:  
Paper Mache House Box (by Darice)
DecoArt Media Fluid Acrylics: Quinacidone Magenta, Hansa Yellow, Cerulean Blue, Titanium White & Carbon Black
DecoArt DecouPage
DecoArt Media Liquid Glass

Supplies:
Rubber Stamps (from River City Rubberworks)
Staz-On Black Ink Pad
Paint chips
1” foam brushes
Paper Cutter
2-sided adhesive tape & glue dots

Embellishments:  Iconic game pieces

The How To
Paint sides and roof of paper mache house with DecoArt Media Fluid Acrylics.  I painted each side a different color.
Stamp images on paint chips using Staz-On ink.  Cut paint chips to fit box sides and adhere stamped images to house using DecouPage by brushing medium on back of paint chip and paper mache house.  
Add embellishments using DecouPage (it's also a glue!), adhesive tape or glue dots. 


Paint Scrabble trays with Media Fluid Acrylic.  Spell out “Old Friends” using scrabble tiles, 
and place on trays.
This MahJongg rule book from 1958 was a great flea market find.

Place finished house onto BINGO card and display on game board.  Fill box with old-time
candy and share at your next Game Night. 


 How many games can you find in this project?  Do you spot your favorite game?


Disclosure:  I was provided product from DecoArt but all opinions and ideas are my own.


Tuesday, January 6, 2015

New Year: New Calendar


Happy New Year! Let's ring in the new, and throw out the old. No, wait! Don't throw out the old. Instead, "upcycle" it.

As I near the age matching the year I was born (mid-50's), I find this creative phrase a metaphor for life. Instead of grumbling about all those things that we mid-50 year old women find astonishing (like hairs on the upper lip, a body in need of toning, and grumpy teenage children, just to name a few), it is time to upcycle ourselves: limit the sugar and white flour, exercise for life, share a smile more often, and stop being so hard on ourselves. The super-Mom syndrome of the past few decades is no longer acceptable. Instead, it is time to find a gentle balance on our continuing journey called life. That being said, here are my Top 10 resolutions for 2011:

 1. Donate un-used craft items to Girl Scouts.
 2. (Continue to) volunteer at senior centers.
 3. Organize (i.e., toss out) expired coupons, old receipts, and newspaper clippings that I saved to read (but didn't).
 4. Spend more time reading novels and non-fiction.
 5. Take a class to expand my computer knowledge (which will benefit my blog).
 6. Take vitamins regularly.
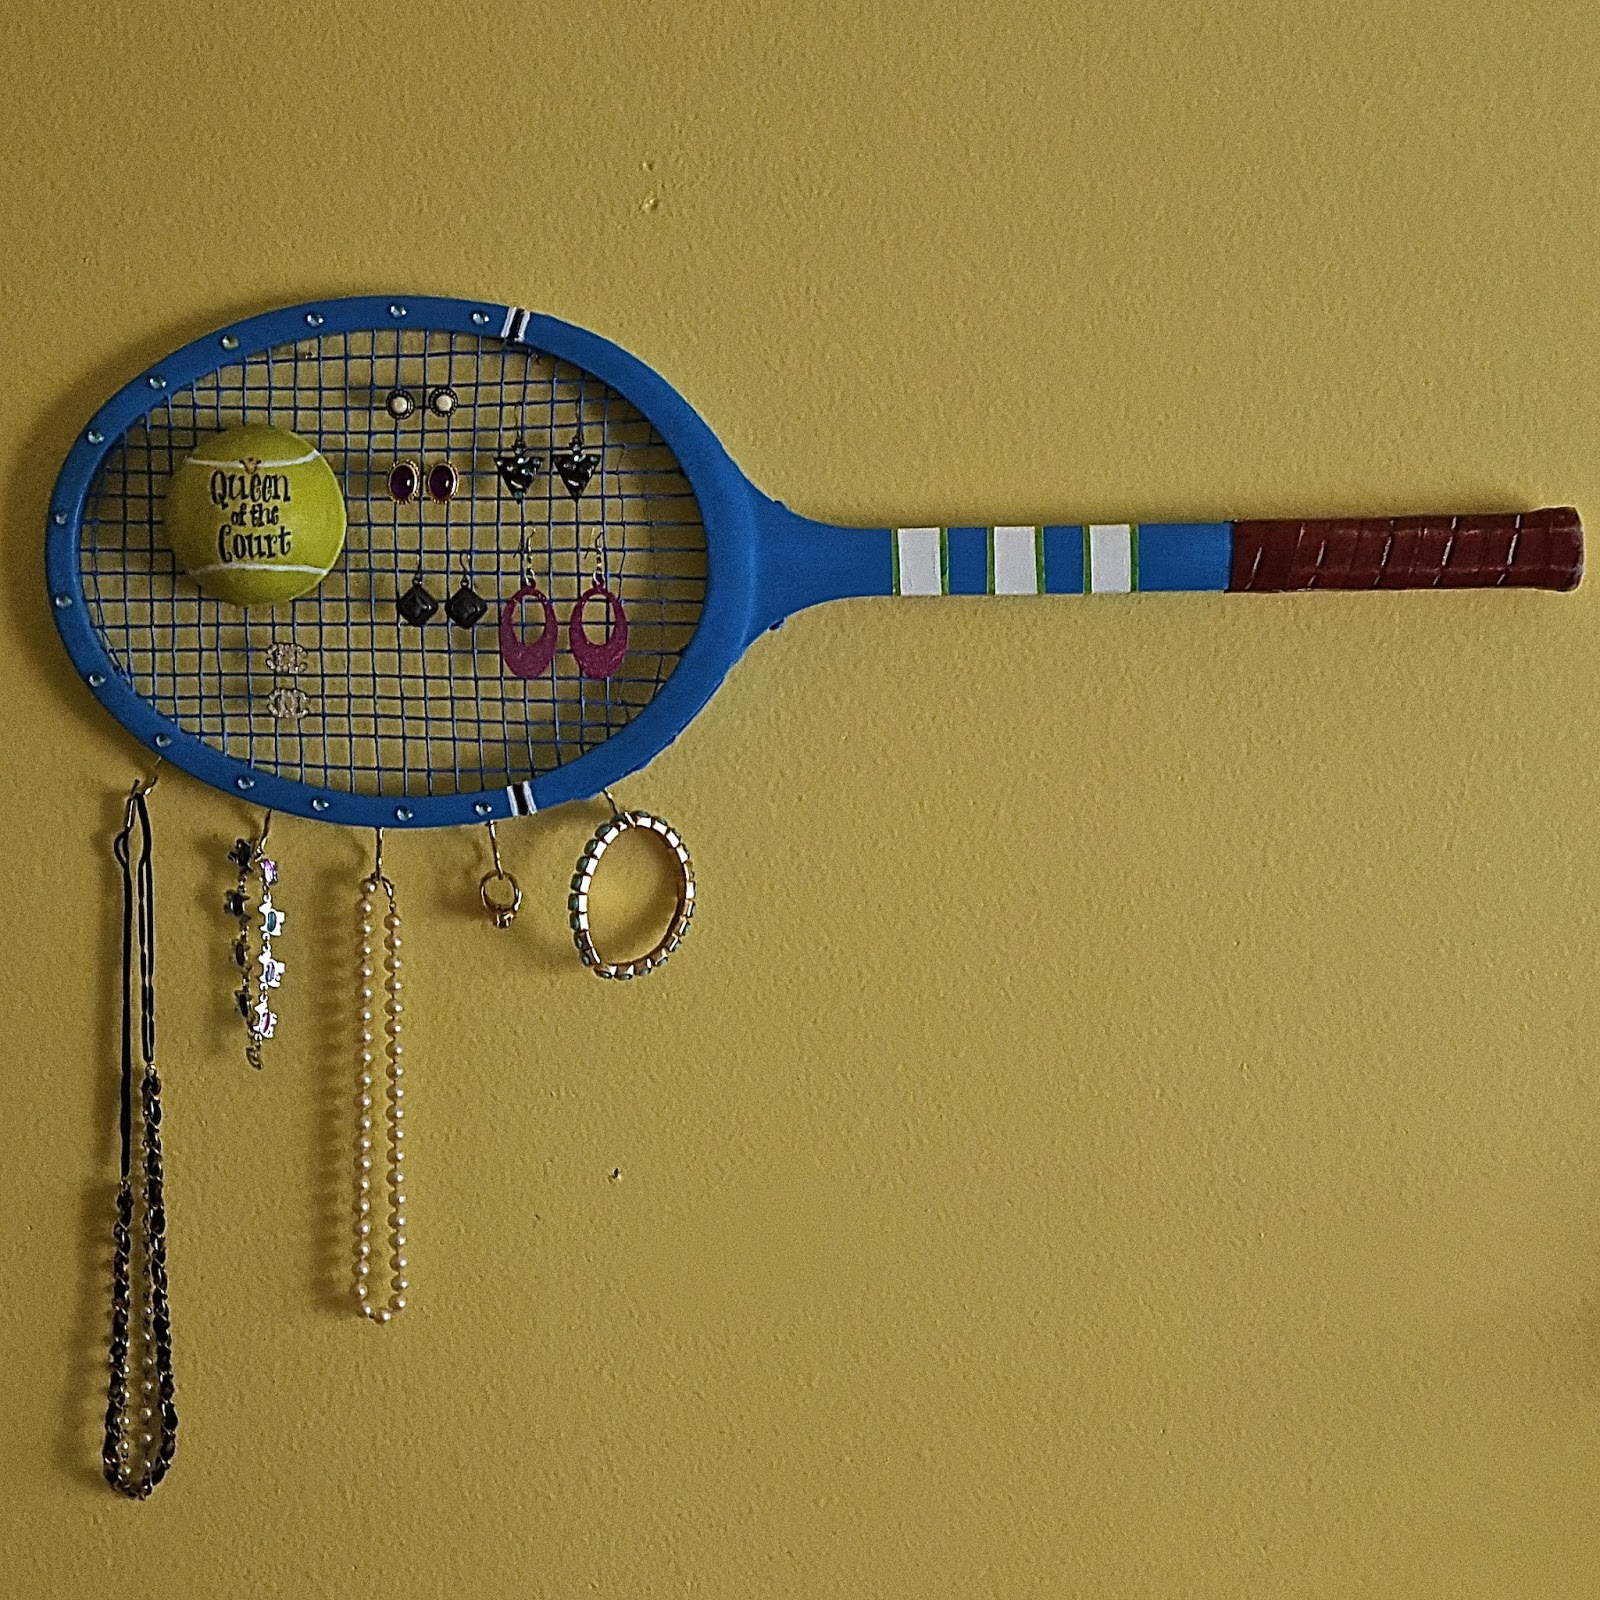
 7. Add a day of tennis to my bi-weekly tennis schedule.
 8. Hide the chocolate--from me (i.e., don't buy the stuff anymore).*
 9. Enjoy spending time (instead of arguing) with our younger daughter for the next eight months before she goes off to college .
10.Think outside the box (i.e., my comfort zone) and expand my crafting repertoire.

*This is going to be tough!

Let's start with Resolution #10: expanding my crafting repertoire; thus, I present my first altered art project for the new year:

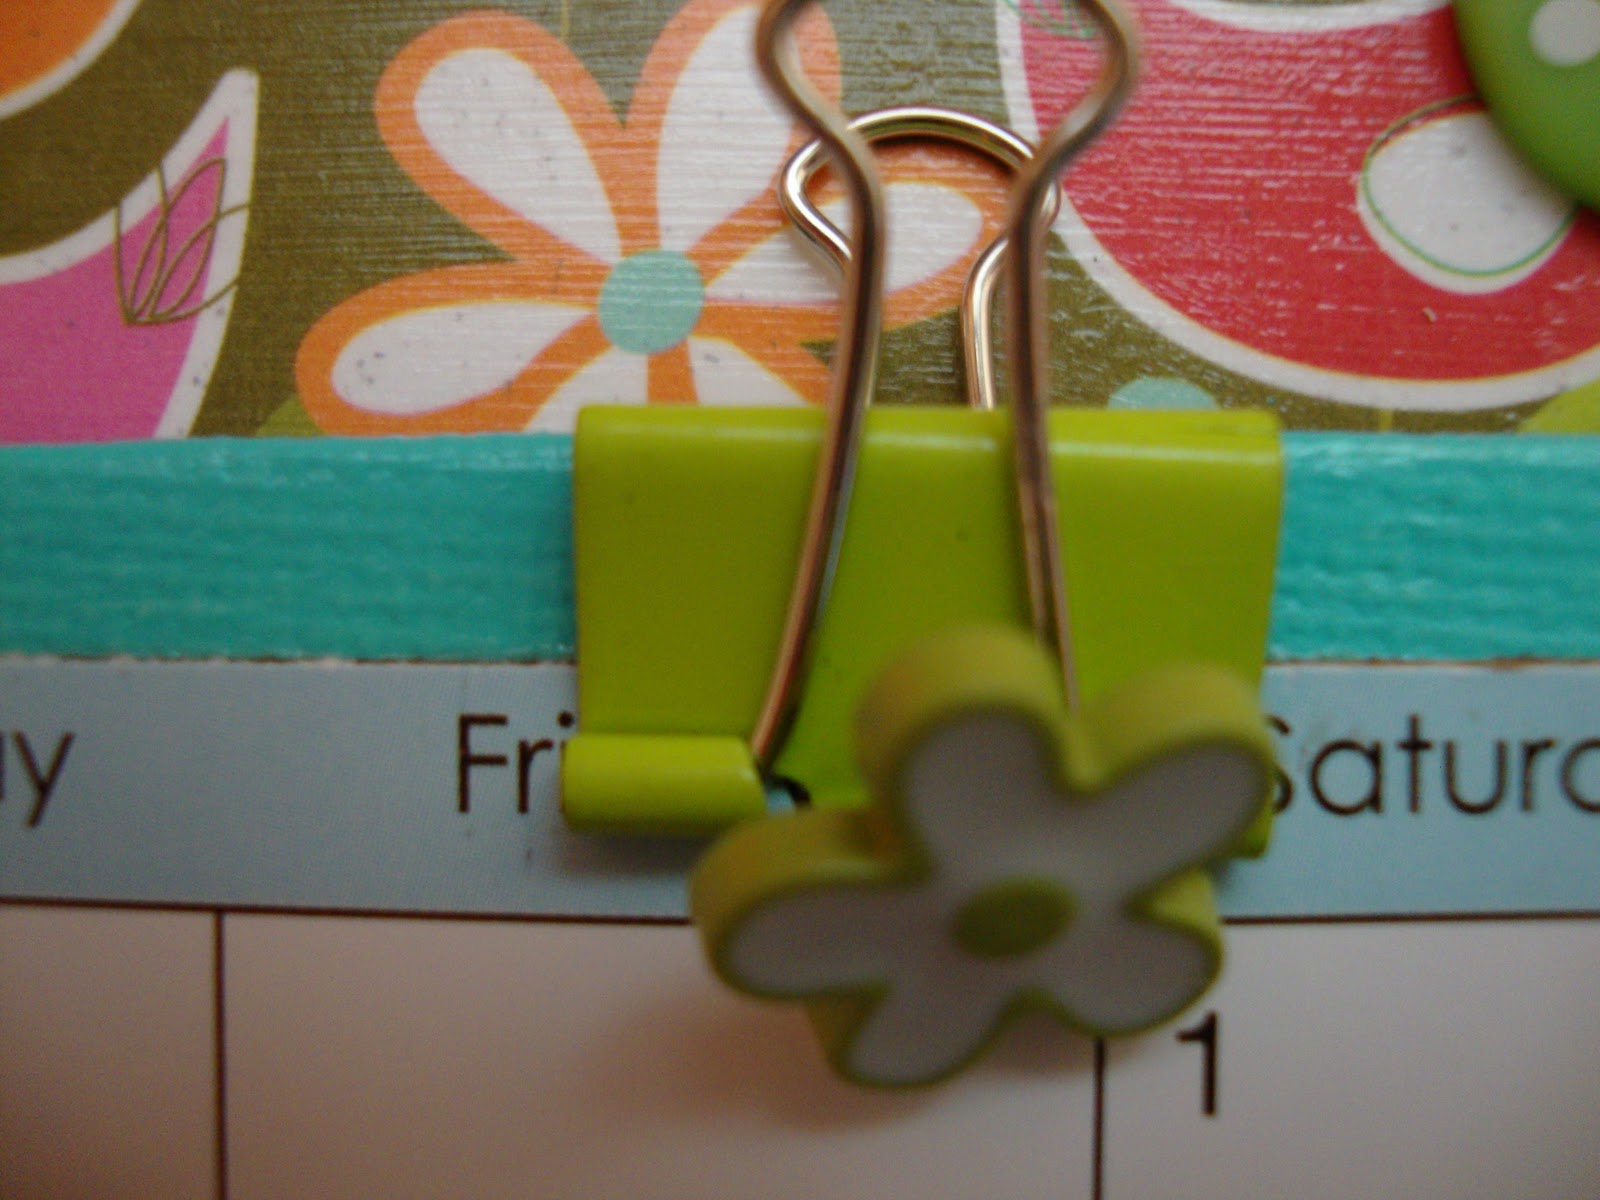
Calendar & Photo Canvas


Material List:

9" x 12" and 6 x 8" canvas panels
coordinating scrapbook paper cut 8-1/2" x 11-1/2" and 5-1/2" x 7-1/2"
acrylic paint & foam brushes
Mod Podge (glossy)
Binder clips
Buttons
Spiral paper clip
Hemp cord
Calendar, cut to fit smaller canvas (I found these for 50 cents at Michael's)
metal label holder & brads
4" x 6" acrylic flat photo frame
photo (which is interchangeable)
double-sided foam tape
assorted ribbon & ric-rac
silk flower (cut from stem and backing)
number stickers
hot glue gun

If you would like a tutorial, leave me a comment and I will be happy to email it to you.  Also, if you like this bright color combination, click here to see the matching mail & note holder I made last year.
Now onto Resolution #9:  enjoying my 17-year old--that is, after she yells at me for waking her...Happy New Year!


Editor's Note:  This is a repost of my 2011 calendar.  Time to update it for the new year!

Doreen

Linking to these fabulous party blogs:

Wake Up Wednesday
Silly Pearl Project Inspire(d)
A Dose of Paige Create & Share
Project Parade Link-Up
Domesblissity


Friday, December 19, 2014

Repurposed Desk into Beverage Station


Repurposed furniture

I bought a vintage furniture piece last year at the local flea market.  I'm not sure if it was a desk, table, bookcase or credenza.  All I know is that it had great bones, four deep drawers and two shelves.  It just needed a vision and some paint.

After a good cleaning, I decided on a nice shade of duck egg blue.  I used two coats of chalk paint which covered the wood well.   I painted the drawers a soft white [also chalk paint] to contrast with the blue.

The handles were impossible to remove, so I just painted them as well.

When the paint dried, I lightly distressed the entire piece using sandpaper.  I stained the top veneer matching the current wood tone, then I waxed the entire desk.

Earlier that day, I picked lemons from our citrus tree, which gave me a great re-purposing idea for this piece.  With a few accessories, I turned it into a beautiful lemonade serving center.


Ready for a refreshing glass of lemonade?

And to show its multi-purpose, I re-dressed the serving center for use in our daughter's bedroom.  Found some coordinating storage boxes in the closet, which fit perfectly on the shelves.  This is a great place to store sewing or school supplies, beauty accessories & more.


For now, I'll stick with the lemonade.  
Even though it's December, the sun is out, and it's getting [almost] warm.  
That's life in Southern California.
However, once the sun goes down, 
this will most likely become a hot cocoa station!
Now where did I put the marshmallows?
Stay Warm!

Missed a post?  Check these out:
pretty fonts

  painted furniture   

 Organizing Crafts

I've been featured!

Feature party button for Prodigal Pieces


Related Posts Plugin for WordPress, Blogger...