PLEASE VISIT MY NEW BLOG

Showing posts with label gifts. Show all posts

Monday, July 2, 2012

Handmade Gift Exchange

Sometimes crafting can be a solo sport.  Other times, it can bring friends together and even provide opportunities to make new friends, such as participating in Linda's Craftaholic Anonymous Handmade Gift Exchange

Linda coordinated a huge gift exchange with crafters across the country.  We were each assigned a "giftee" and, in turn, a "gifter."  My giftee is Cathy who lives in South Carolina.  As you may recall, I recently posted a tutorial on an altered chalkboard here.  I thought this would make a pretty as well as useful gift.  Using a brown and turquoise color combination, I altered this chalkboard with a garden theme. 

Pin It
Garden Theme Chalkboard

Layered Flowers & Watering Can Button

Upcycled Mint Tin becomes Chalk Holder


Sure hope Cathy likes it. 
In the meantime, I'm looking forward to seeing what my gifter has made me! 
Is that the mail carrier I hear?

Thank you, Linda, for hosting and organizing such an incredible and creative exchange.


Saturday, February 4, 2012

You had Me at Hello.


The title says it all.  For anyone who's never seen the film, "Jerry Maguire," it is the best Valentine's movie EVER. The phrase, "You had me at hello" is one of the more iconic phrases in my vocabulary, and it is the creative catalyst for this altered art project.  And best of all, I used materials from my stash! 
I started with these somewhat "cugly" striped coasters 
which I immediately painted with black acrylic paint.  Bye stripes!

While the coasters dried, I cut out three squares of beautiful vintage
scrapbook paper to fit the coasters, and rounded the paper at the corners.
Next, I adhered the paper to the coasters with matte Mod Podge. 
I usually use a glossy finish for my projects; however, this matte finish
lends itself nicely to a vintage, romantic feel.
One more coat of MP on the top.
I edged the coasters with a bit more black paint, giving it a distressed look.
Then I dug deep into the dark corners of my craft closet in search of love--
love-themed embellishments, that is. 
I hit it big when I found a set of large white chipboard hearts. 
The chipboard has great texture, so I decided instead of covering them,
to stamp a French script design using black ink.  Voila! 
I continued embellishing the coasters with love-ly charms, acrylic flowers, baker's twine, chipboard, washi tape, acrylic tag, and a rub-on.   Then I typed up the wonderful phrase, adhered it to red chipboard and finished all three coasters off with additional Podge.

Then I contemplated how to display these coasters.  For those who know me, you are probably thinking well, of course, she is going to use a lot of ribbon.  That's what I thought.  However, I decided to return to the dark depths of my craft closet to see what other crafty treasures await. 

Lo and behold, I found a distressed green wooden frame. It was one of my Home Goods clearance finds I bought a few years ago for $3.50.
Only problem:  the signage.  It reads:

That will never do.  Unless this project is a gift for my dog.
How nice that Coconut already taped up the sides of the frame, so all I had to do was paint the inside of the frame in a warm antique white hue.

Then I adhered the coasters to the inside edges of the frame.


Pin It
I kinda like it. 
And I know Tom C my husband will like it, too. 
Happy Valentine's Day!

Having fun at these parties
A Delightsome Life
Love 2 Upcycle
valentine round up button

Two Little Birds Decor
Adorned from Above
Sugar Bee Crafts
Whipperberry
Mad in Crafts
Dear Lillie
Summit Street Joy
Lollipops Cards
Vintage Wanna Bee
Lil Luna
Blue Cricket Designs Show & Tell
It's Overflowing with Creativity
Passionately Artistic
Making the World Cuter
Today's Creative Blog
Polly want a Crafter
Cowgirl Iink up party at Ivy Cottage
A Bowl full of Lemons
At home with K
Serendipity and Spice
Homemaker on a Dime
Ginger Snap Crafts
The Girl Creative
Tator Tots and Jello
Craft-o-Maniac
Skip to my Lou
I should be Mopping the Floor
Under the table and dreaming
All Things Fee
Nifty Thrifty Sunday
I Heart Naptime
Flamingo Toes Pink Sunday
Serenity Now
The Answer is Chocolate
Positively Splendid
Young and Crafty,
Measured by the Heart


Tuesday, September 14, 2010

Tennis anyone? Maybe after dessert.

First of all, I want to welcome those of you who have just discovered my blog.  It is filled with fun altered artwork as I "transform the mundane -- one embellishment at a time".  Feel free to scroll down the posts or click on any tags that sound interesting to you.  If you see something you really like, please let me know with a comment! 

And, I want to let everyone know that today I am being featured on a fantastic blog called Paisley Passions.  I am absolutely thrilled, and want to thank Lori, from the bottom of my button jar, for this wonderful opportunity to share my altered artwork with her blogging friends.

And now for today's altered artwork feature: my recipe-in-a-tennis ball can.  Every December, my tennis group gets together for a holiday luncheon, and we swap gifts.  I decided to get each of my tennis buddies a new can of tennis balls, minus the balls! 
gifts for tennis
A new twist to tennis:
Recipe-in-a-tennis ball can!

I removed the cellophane wrap, made my own wrap out of two coordinating papers plus a white strip with "Fudgy Brownies" repeatedly printed across the entire length.  I added a wooden spoon, ribbon, a flower, button, and a tag on which I stamped the word "love".  (You gotta love a sport that uses the word "LOVE" instead of "ZERO".)  Then I glued a silver tennis racquet charm onto the tag.  (This charm can be removed and then easily attached to a necklace chain.)


brownies in a Jar

I found a delicious fudgy brownies-in-a-jar recipe, and adapted the recipe ingredients to fit inside the tennis ball can.  I typed up the recipe, printed it out on a 4" x 6" card, laminated it, and slid the card between the wooden spoon and the can.  (You may need a glue dot here and there to hold the card and spoon in place.)  Then I placed a crisp, clear cellophane bag into the can, and carefully layered the dry ingredients into the bag, tying the bag tightly at the top. 

Not only were these handmade gifts a big hit, the fudgy brownies were delicious.  I included the three brand new tennis balls inside the gift bag with the altered can.  It was the perfect gift.  Now if I can only perfect my serve!  
 
Tie on a little "love" tag with a silver tennis racquet charm
Thanks for stopping by! 
See you on the tennis courts.
Doreen

Click here to link to Paisley Passions.


Monday, April 26, 2010

I went to a Garden Party...

"I went to a garden party to reminisce with my old friends..."  Just the other day, I heard Ricky Nelson's 1972 hit on the radio, which gave me the inspiration for this art project and post.  Planting flowers and vegetables seems to be the "in" thing to do in my neighborhood.  In fact, my next door neighbors have a wonderful garden right in front of their house with everything from kale to strawberries.  They tend to it everyday, enjoying the fruits (and vegetables) of their labor.

Apart from my throwing flowers into a few pots, the only gardening that I do is in the form of art!   I have created an altered artworks garden pail --I know it pales in comparison (ooh, sorry!) to my neighbor's garden, but as they say, it's the thought that counts! And that's exactly what this is: a thoughtful and personal handmade gift for a friend, Mom, aunt, teacher, or even your next door neighbor!  This is the finished project:


making a garden pail gift

Here's how you make it:

Start with a clear acrylic pail bought at your local crafts store.

Choose colorful, fun scrapbook paper
I used a garden motif.  Cut a 3-1/4" x 12" strip of paper, and mod-podge it (hey, Amy -- is "mod-podge" an actual verb?), wrapping the paper around the circumference of the pail, leaving a 1" space at the bottom.
 
The pail is about 1/2" smaller in diameter than the 12" paper, so I just added a 3-1/4" length of 1/2" ribbon to cover the gap.  You can also just add an extra inch of the scrapbook paper, and believe me, no one will be the wiser.  Cut a 3" circle and mod-podge this to the lid. After a few minutes, apply additional Mod Podge over the paper.
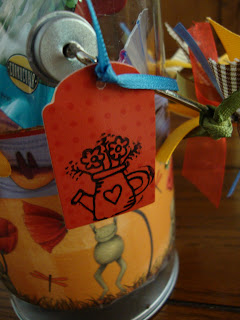
I added a punched tag (using EK Success' new Journal Plate punch) , a cute bug charm, and spelled out "Mom" with my label maker.

I continued adding colorful, coordinating ribbons to the handle, a chipboard bird, flowers, a brad, and finally a chipboard tag (stamped with a picture of a watering can with flowers).
decorating acrylic pails


The next step is to fill a clear cellophane bag with potting soil, and place it inside the pail making sure you can see the soil at the bottom.
Then add a brightly-colored shovel, a few packets of flower and vegetable seeds, several plant food stakes, and you have a personal gardening gift!
Of course, you can add anything to the pail such as gardening gloves, a coupon "good for one day of helping plant the seeds" (great for kids to give to their Mom or Grandma) and maybe even some herbal mint tea bags.  
 
Coincidentally, while I was writing this blog, the door bell rang and it was my wonderful neighbor, Kay, with a beautiful bunch of sweet peas for us! I think her ears must've been ringing!  Now I know exactly who's receiving this garden pail.

Tuesday, October 20, 2009

Creative Therapy

Some call it arts & crafts.  Others say it's time well spent.  I call it creative therapy.

Whatever the name, Altered Artworks provides workshops in a warm, creative environment, giving you the opportunity to awaken your creative muse.  With our busy lives going in many directions at the same time, pause to treat yourself to some creative therapy.


Choose from a variety of altered art projects:  a beautiful clipboard with coordinating pad of paper and over-sized note holder; ceramic tile coaster set, crystal candle holder complete with wonderfully-scented candle, two-panel canvas photo frames, desktop notepad & pen set, personalized journal and a decorative photo box.  View pictures of projects on the right sidebar of this page.  Click on any photo to enlarge it and view the detail.

Each project begins as a plain, bare item.  One embellishment at a time, you will transform this item into a beautiful and useful piece of artwork.  Everything you need is included in the price of the workshop including a selection of designer papers, acrylic paints, ribbons, buttons, metal embellishments, flowers, tags and charms.  You choose your own materials, making each art piece personal and original.

What transpires is Creative Therapy!  Located in the West San Fernando Valley, these workshops are just what you need to get away from it all (for at least three hours anyway). Reservations are a must as space is limited to 8 people per workshop.  Classes are held on selected Friday mornings 10 AM -1 PM and Sunday afternoons 1-4 PM.  In addition, if you get together at least four people, you can plan your own private workshop tailored to your creative needs. Planning a bridal shower?  Make some great votive holders using the bride's wedding colors.  In a book club group? Create reading journals to keep tabs on books and meeting dates. Need a special birthday gift for your BFF? Make a decorative clipboard to coordinate with her office or kitchen.

With the holidays approaching (yikes, already?), it's time to think of all those special people in your life who will appreciate a handmade gift that is useful and doesn't need dusting!  These altered artwork items make great gifts for teachers, coaches, hairdressers, work associates, family and friends.  Once you make it, however, you might want to keep it for yourself, so come and make two!

To register for workshops and get more information, email Doreen at dozeedo@gmail.com.  Looking forward to sharing creative moments together!
(Scroll down to view previous posts.)
Related Posts Plugin for WordPress, Blogger...