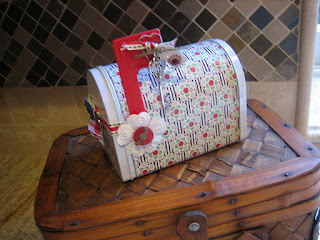
You look so familiar. Do we know each other?
Oh yes, I recognize you now.
We frequently run into each other in the $1 aisle at Tar-che[z]!
Well in that case, you probably bought a few of these tin mailboxes.
Did you get one in red, white or pink? Oh, one of each color! Me, too...
But first, I must alter the mailbox...
Materials:
- one tin mailbox (your choice of color)
- Decorative scrapbook papers
- Three coordinating Ribbons
- Metal Charms (lockets, keys, hearts, etc.)
- Flowers
- Buttons
- Mini tag
- Mod Podge
- Dymo label maker
Carefully move the flag out of the way as you adhere the paper. If the area around the flag anchor tears, you can cover it with a flower later, and no one will be the wiser. Let paper dry with flag in up position.
Cut additional piece of paper 1" wide x 3" long.
Adhere to one of the open sides.
You can, of course, cut two pieces of paper, and embellish both sides.
Let dry.
Using Dymo label maker, type "Be My Valentine"
or other phrase of your choosing, and stick label below paper.
Apply another coat of Mod Podge over the entire mailbox.
Cut 5" lengths from three different ribbons.
Tie together all three ribbons into a knot,
catching charm locket in knot as well.
Tape ribbon ends of one ribbon to inside of mailbox.
Trim additional ribbon ends.
Embellish flag with flowers, buttons, key charm, and mini tag.
Add contents. For the chocoholic, use kisses.
Or fill mail box with stationery, tissue pack, key chain and a candle.
You can also add a gift card and coupons.
Done.
Don't forget to place the flag in the up position!
Partying with these lovely bloggers:


What a gorgeous idea - I love it. Thanks for stopping by my blog and following - Im following right back! Take care. Nat
ReplyDeletehttp://northshoredays.blogspot.com/
What a cute idea. I wish I lived near a Target...I'm out in the middle of nowhere!
ReplyDeleteHolly
Absolutely beautiful in every fine detail!
ReplyDeleteThank you so much for sharing your talent and creativity on “A Little Birdie Told Me…” at Rook No. 17! Looking forward to seeing what inspirations you’ll share tomorrow!
Warmest wishes,
Jenn
This is so cute!
ReplyDeleteHa--I admit I own about 4 of these mailboxes and have yet to decorate one yet! So cute. Thanks for sharing at oopsey daisy!
ReplyDeleteHi Doreen, this mailbox is absolutely adorable. What a lovely gift for that special someone on Valentine's Day. Thanks for sharing. I have recently found your blog and am now following you, and will visit often. Please stop by my blog and perhaps you would like to follow me also. Have a wonderful day. Hugs, Chris
ReplyDeletehttp://chelencarter-retiredandlovingit.blogspot.com/
Your vt mailbox is sooo cute! Definitely load it up with kisses! :)
ReplyDeletegreat tutorial Doreen!
thank you for linking up and linking back to catch as catch can!
gail